![]()

As WebP continues to gain popularity as a go-to compressed image format for the web, you might be surprised to find that many professionals – whether as web developers or content creators – need a quick and efficient way to convert batches of images to WebP on a Mac. Since macOS doesn’t offer a native option for bulk converting JPGs and PNGs to WebP, it’s natural to look to third party solutions. But what if, with just a little tweaking in Mac’s Automator app, you could unlock the ability to batch convert images to WebP seamlessly? It can be done, for free, and its much simpler than you might think.
This guide builds on a blog post about converting images to WebP using the Mac command line. You’ll be using the same WebP toolkit from Google, which is installed through Homebrew. So, the first step is to install Homebrew if you haven’t already. Then, you’ll install Google’s WebP tools via Homebrew to get access to cwebp as a command-line utility on your Mac.
But don’t worry – you won’t have to use the command line beyond the initial setup. Instead, you’ll set up an Automator Quick Action in Finder, allowing you to quickly compress and convert images to WebP with just a few clicks. If this all sounds like techo-gibberish, don’t worry, we’re going to walk you right through it.
Installing the necessary support software
The first step we’ll need to take is to install Homebrew. It is a free tool that makes it easy to install and manage software on a Mac using the command line. Think of it like an app store for behind-the-scenes tools that Apple doesn’t include by default. Instead of searching for and manually downloading programs, you can install them with a simple command in the Terminal. It’s especially useful for developers, tech-savvy users, and anyone who needs extra utilities that make their Mac more powerful and efficient.
In order to install Homebrew, open the Applications folder on your Mac, then open the Utilities folder, then click Terminal. Once the app opens, type in the following command and hit return.
xcode-select –install
When that completes, type the following command, and again hit return.
/bin/bash -c “$(curl -fsSL https://raw.githubusercontent.com/Homebrew/install/HEAD/install.sh)”
Once that complete, you’ve successfully installed both Command Line Tools (from Apple) and HomeBrew onto your Mac. The next step is to install Google’s WebP encoder software. Type in the following command and hit return.
brew install webp
Once that installation completes, we’re done with the Terminal app, so you can close it.
Creating an Automator Quick Action
Next up, we’re going to create a Quick Action in Automator that will use the cwebp command-line tool to convert image files to WebP format effortlessly. Once it’s set up, you’ll have a convenient “Convert to WebP” option right in Finder’s contextual menu. This means you can quickly convert any image – or even a full collection of images – with just a right-click, making your workflow faster and more efficient. Let’s dive in!
- Open the Applications folder on your Mac, then click on Automator.
- Click New Document.
- In the ‘Choose a type for your document’ window, click Quick Action.
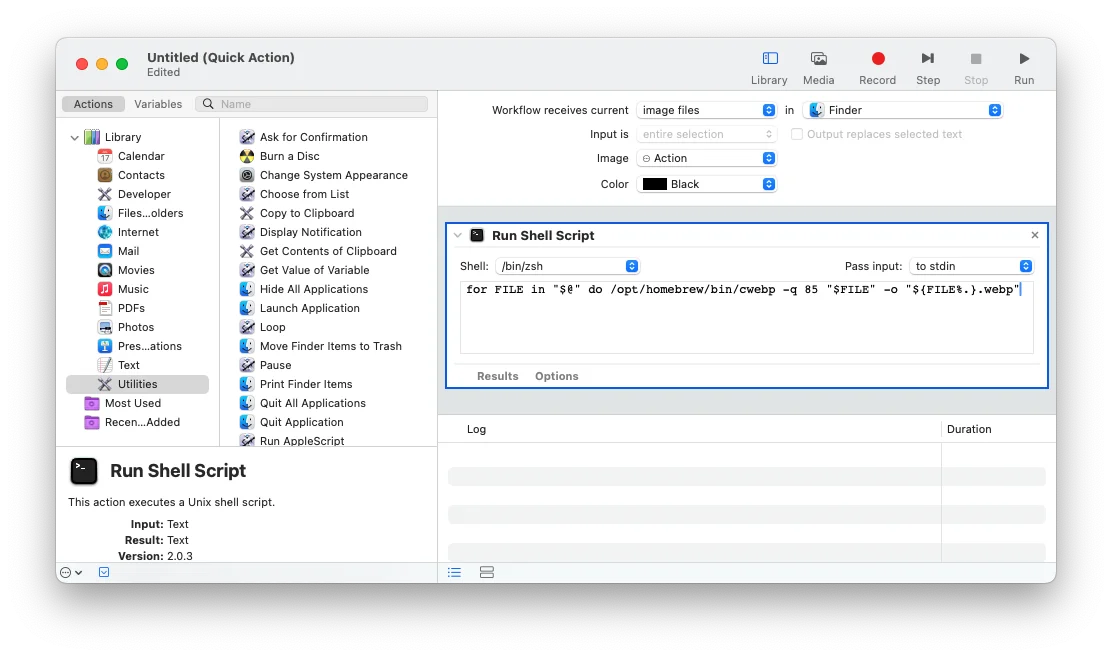
- Set Workflow receives current to image files.
- Set in to Finder.
- Next, in the left side panel in Automator, click Utilities.
- In the second panel, double click Run Shell Script.
- Change Pass input to as arguments.
- Next, empty the text box below and copy/paste the following command in the box:
for FILE in “$@” do /opt/homebrew/bin/cwebp -q 85 “$FILE” -o “${FILE%.}.webp”
Your Quick Action workflow should now look like this:
Finally, save your Quick Action from File > Save menu, and name it something like Convert to WebP. Whatever you name the Quick Action is what will appear in the Finder contextual menu when you use the Quick Action.
Let’s give a try
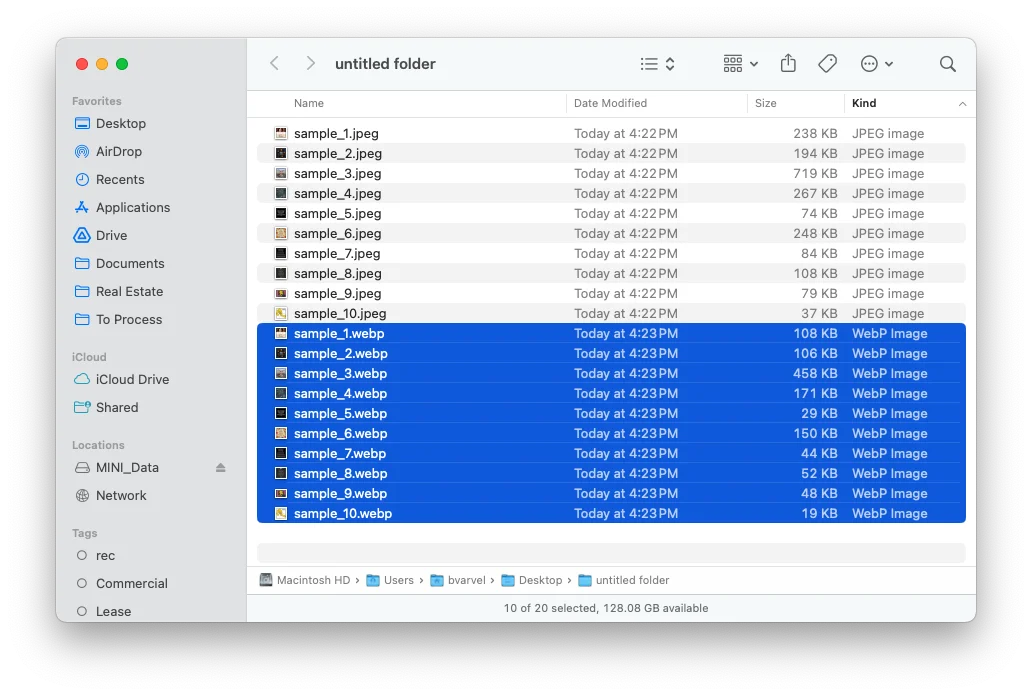
You’ve now installed all the support software needed and created your Automator Quick Action. Now it’s time to give it a try. Go to Finder on your Mac, and locate any image file or collection of image files and select them. Now right-click, go to Quick Action, and select Convert to WebP, or whatever you named your Quick Action above.
Your newly created converted webp files will appear in the same directory with the same file names except they’ll now carry the .webp extension. With your newly created Quick Action, you can convert a single image or batch convert an entire list of images.
A couple of things to keep in mind for this little script:
- The path to cwebp is set for cwebp installed through Homebrew. If you installed cwebp manually then it’s probably in /usr/bin instead and you’d want to adjust the path accordingly.
- The -q quality flag is currently set to 85 but you can set it to anything between 1-100. A higher number will produce higher quality images, but less compression.
A few parting words
If you’re not familiar with WebP, it’s an image format developed by Google that’s designed to be both efficient and versatile. It supports still images, animations, and both lossy and lossless compression, making it a great choice for web optimization. The cwebp tool you’ll be using is Google’s official WebP encoder, perfect for batch converting images into this format.
If you’re curious, you can check out more details here. The shell script powering this conversion is a modified version of one originally created by Jay Holtslander – you can find the original here.